Perhaps it’s nostalgia or the art that draws men to a straight razor shave. However, barbers typically discourage men from trying to shave with a straight razor on their own.
The straight razor shave is done with a folding steel blade and was once the standard of men’s shaving. These extremely close shaves look professional and feel much cleaner than with an electric trimmer.
There are a variety of different straight razors widely available on the market today. We look at the benefits of this close-shave razor and a guide for shaving at home.
Straight Razor Shaving
Straight edge razors AKA “cut throat razors” date back to the 4th millennium BC, with gold and copper blades included in ancient Egyptian tombs. Eventually, they’d become carbon steel-edged razors.
See our guide on the Best Straight Razors
Razor Construction
Today’s straight razors are still designed differently than any other razor on the market. While most just see the incredibly sharp blade, it’s important to know the different parts of this razor so you can use it correctly.
Here’s a look at a typical straight razor and its parts from the Original Shave Company:

High-quality straight razors will be made from steel and have a leather or metal handle. However, they could also be silver-coated.
The best straight razors still use steel, and the most high-end products likely have a “Japanese steel blade,” which is considered sharper and thinner, though slightly harder to control.
Benefits
With only a single blade in contact with the skin, it has a distinct advantage over poor-quality multi-blade disposable razors. These razors become dull and pull on whiskers often cutting them below the skin causing painful ingrown hairs.
- Hollow-ground blades
- Replaceable blades
- Blades can be resharpened
- Closest shave available
Cost of Straight Razors
When shopping for these straight razors, you’ll notice a higher cost, especially when looking at straight razor kits. These may be over $100 depending on the quality of the blade and other accessories included.
High-quality straight razors have extremely sharp, durable steel blades that are balanced for the ultimate shave.
However, stainless steel is considered the standard, and even less expensive straight razors have blades made from this material.
Blades and Handles
The difference in cost comes down to the blade and handle material. Cheaper razors may use lesser quality steel that will be thin and easy to bend, leading to poor shave quality.

There’s also a difference between Japanese steel and other types of steel, such as German blades. Japanese blades are typically thinner and sharper, requiring less sharpening.
For the best straight shave, you want to look at the durability and sturdiness of the handle. Flimsy materials can make it harder to grip and shave, even with a relatively sharp blade. The best handles will be made of leather or wood.
Straight Razor Accessories
When purchasing a kit, you’ll likely get all the accessories needed to maintain and sharpen your blades, including a leather strop to sharpen your blade’s edge.

These blades are designed to clean shave even the bushiest, longest beard styles, so prepare for them to be extremely sharp right out of the box.
Some accessories include:
- Leather “strop” for sharping
- Alcohol wipes
- Microfiber cloth
- Shaving cream or shaving soap
- Refined camellia oil (for lubricating the blade)
These elements typically make the kit more expensive, but you’ll have everything you need to start shaving with a straight razor at home.
Cleaning Straight Razors
When cleaning a straight razor, there’s one rule: don’t get water on the scales (also known as the handle).
You also want to be careful about leaving your razor in water for long periods of time or getting waster into the screws or other intricate parts of your blade.
Over time, these parts can rust and lead to opportunities for disease and infection if accidentally cut. Additionally, if you leave water on your blade, it could lead to water spots and further blade deterioration.
You can’t leave straight razors in water or place in a dishwasher.
Here’s my step-by-step guide to maintaining your razor
What you’ll need:
- Liquid dish soap
- Isopropyl alcohol
- Toothbrush or small scrubby
- Q-Tips
- Leather strop
- Microfiber cloth
- Camellia oil
- Small bowl with warm water
1. Rinse the Blade First
Place your razor into the bowl with warm water, avoiding getting the handle wet. Add a dab of dish soap onto the blade. Use a toothbrush or other non-abrasive scrub tool to clean up the blade, removing any debris or stains.
Use Q-Tips or toothpicks to get into small crevices and remove debris or leftover soap if it gets into small grooves.
Once finished, rinse off the blade and wipe down with the microfiber cloth.
2. Apply Isopropyl Alcohol to Blade
Dump out the water from the bowl and fill with isopropyl alcohol. Place the razor into the bowl, covering the entirety of the blade.
This disinfects and sterilizes the blade, but you should also notice it cleans away any grime or residue leftover, making your blade shine.
Alcohol doesn’t last long and will dry on its own, but it’s best to go over it with the microfiber towel.
3. Sharpen with the Leather Strop
This can get tricky, so we found this video that provides a visual guide to sharpening and taking care of your blades:
Be Responsible
Straight razors are incredibly sharp. In fact, some people can’t watch someone getting a straight shave by a professional barber. What if they get nicked or accidentally cut a mole off?
Therefore, it’s important to be precise and careful when using a straight razor, particularly if you’re shaving your neckline and jawline.
Have Confidence
The key to a safe, straight shave is learning about the process and being confident to hold the razor correctly while shaving your face. If you’re in a hurry and need to shave quickly, you may not like a straight razor.
Straight razor vs Electric razor? If you’re used to shaving with an electric razor a traditional Gillette razor, or even a safety razor, you must relearn shaving to use a straight razor blade.
How to Use a Straight Razor
With a little practice and time, giving yourself a straight shave is a rewarding experience. The type of blade matters when learning how to shave with this extremely sharp razor as well.
So keep this in mind when considering what straight razor to buy:
- Heavy, Thicker Blades: Start with light pressure and apply more to see the perfect balance.
- Lighter, Japanese Blades: Lightweight blades need more pressure than heavy blades.
It’s important to approach the first few strokes carefully and not “jump the gun,” which can lead to severe cuts.
Here’s the process to getting the best straight shave (see video under Step 3 for visual guide):
1. Prepare Your Skin
Take a shower first to open up your pores with hot water. You may want to use a moisturizing beard wash if you have sensitive skin. Before starting, you can also apply a pre-shave oil or cream to condition your skin even more.
Shaving prep is key for a smooth shave, but also for avoiding razor burn and nicks.
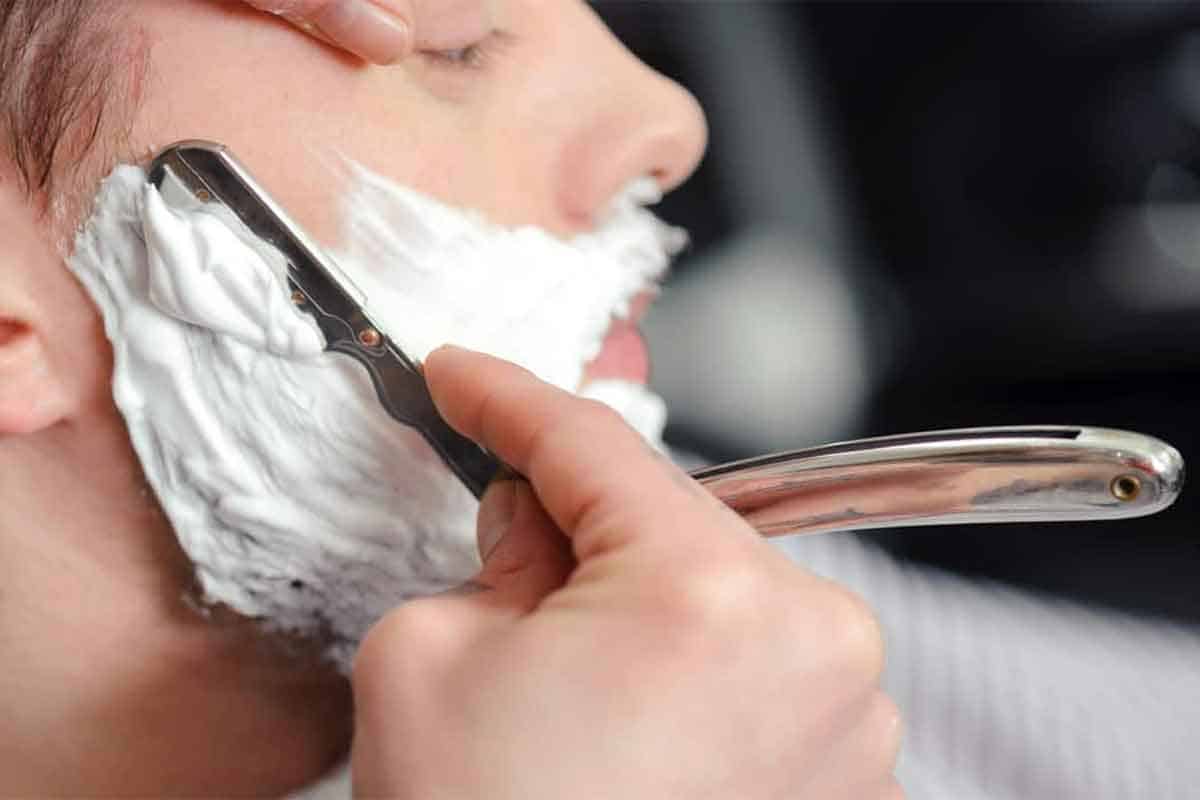
2. How to Hold the Razor
The best way to hold a straight razor is at a 30-degree angle to your face, which is a diagonal angle.
You don’t want to hold the razor flat against your skin as it will tear away at your hair follicles and skin. If you hold it to steep, then you’ll likely cut yourself.
Grip the handle firmly, adjusting as you shave for the contours of your face. You will need to pull your skin taut in certain areas to apply the razor correctly.
3. Make Your First Stroke
Start on one side of the face, typically at the sideburn where you want to start removing hair. Now, move downward with the blade. You can start at the top of your cheek near the ear, then move the blade, removing hair with a short, calm stroke.
You don’t want to jerk the blade. Instead, move slowly with short strokes, shaving away hair and rinsing off the blade in hot water between strokes.
You don’t want to pull or drag the razor along your skin, and remember to keep your skin taut as you shave.
4. Shave Your Upper Lip and Chin
At this point, you’ll move the razor and lift it up slightly as you head to your chin so that you use the middle part of your razor.
You never want to start shaving at the middle point of your chin.
Instead, begin a little bit away from the most prominent area of your chin and use gentle, steady strokes.
You’ll likely need to go slowly around your chin and mouth to avoid cuts. It’s important to be precise and re-lather your face with a shaving gel or cream.
5. Moisturize and Finish
Once finished with the shave, you should splash cold water on your face to close up your pores, then apply an after-shave balm or cream, patting it onto your skin instead of rubbing.
Don’t Forget to Rinse and Dry Your Blade After Shaving
Razors should be stored in a dry, leather case. You also may want to apply camellia oil or blade oil if storing for long periods of time.